VIMproved (henceforth referred to as Vim) editor is one of the popular text editors. It is clone of Vi editor and written by Bram Moolenaar. It is cross platform editor and available on most popular platforms like Windows, Linux, Mac and other UNIX variants. It is command-centric editor, so beginners might find it difficult to work with it. But once you master it, you can solve many complex text-related tasks with few Vim commands. This tutorial is meant to give you the very basic start for your future Vim jurney. It's not meant to be complete by any means. If you are interested, you should check out Tutorialspoint's guide on Vim, most of this content is actually taken from there.
This guide assumes you have the following basic background:
- The basic knowlege of computer system.
- Ability to install, uninstall and configure software packages on given system.
Vim is acronym for Vi IMproved. It is free and open source text editor written by Bram Moolenaar. It was first released in 1991 for UNIX variants and its main goal was to provide enhancement to the Vi editor, which was released way back in 1976.
Vim is considered as clone Vi editor. Like Vi, it is also command centric editor. One of the advantage of learning Vim is – it is available everywhere. Take any UNIX variant like Linux, Mac, HP-UX, AIX and many more, Vim is there by default. Vim traditionally does not have GUI but now there is separate installer called gVim which provides GUI.
There are some of the important features of Vim:
- Its memory footprint is very low.
- It is command centric. You can perform complex text related task with few commands
- It is highly configurable and uses simple text file to store its configuration.
- There are many plug-in available for Vim. Its functionality can be extended in great manner using these plug-ins.
- It supports multiple windows. Using this feature screen can be split into multiple windows.
- Same as multiple windows, it also supports multiple buffers.
- It supports multiple tabs which allows to work on multiple files.
- It supports recording features which allows to record and play Vim commands in repeated manner.
Vim doesn’t have any specific requirements. It is simple software bundle which provides all dependencies.
Installation
- To download Vim visit vim.org
- Click on Download option from left pane
- Click on PC - MS-DOS and MS-Windows option
- Download .exe installer from this page. At the time of writing this tutorial installer name was gvim80.exe
- Double click on installer.
- Follow the instructions from installer.
Configuration
Vim stores its configuration in simple text file namely _vimrc and it is located under home directory of user.
- To find current user’s home directory execute below command in terminal:
$ echo %userprofile% - Navigate to home directory and create a new file namely _vimrc. Ensure that this file doesn’t have any extension.
- Open this file in text editor, enter
set nuand save it: - Now Vim will show line numbers when file is opened.
Installation on Linux platform is quite simple as compared to Windows. This section describes installation and configuration on Debian based Linux.
Installation
- Execute below command in terminal:
$ sudo apt-get update$ sudo apt-get install vim - To ensure Vim is correctly installed execute
$which vim - It should print the location of Vim binary. In my case it was
/usr/bin/vim
Configuration
Vim stores its configuration in simple text file namely .vimrc and it is located under home directory of user.-
To find current user’s home directory execute below command in terminal:
$ echo $HOME - Navigate to home directory and create a new file namely .vimrc. Ensure that this file doesn’t have any extension.
- Open this file in text editor, enter
set nuand save it - Now Vim will show line numbers when file is opened. We’ll add more options to this file latter on.
Vim is little bit different than today’s GUI based editor. It can be started and used from GUI as well as terminal.
Use graphical louncher
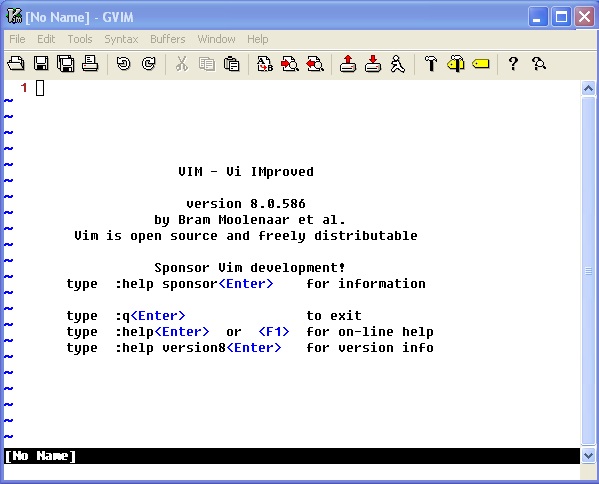
To start Vim from graphical launcher just double click on gVim icon. It will open editor window as follows:

Use terminal
Using Vim from terminal will be identical on Windows as well as Linux platform. Perform following steps to start and quit Vim from terminal:
- Open terminal and enter
$ vim - It will open vim in terminal
- To close this, press Esc key followed by colon(:) and q. In Vim q command stands for quit. This command will be shown in bottom left corner of editor itself.
Vim supports multiple modes. This section discusses some of the important modes which will be used on day-to-day basis.
Command mode
This is the default mode in which Vim starts. We can enter editor commands in this mode. We can use variety of commands in this mode like copy, paste, delete, replace and many more. We’ll discuss these commands in later sections.
NOTE − Here onwards, any Vim command without colon indicates that we are executing that command in command mode.
Insert mode
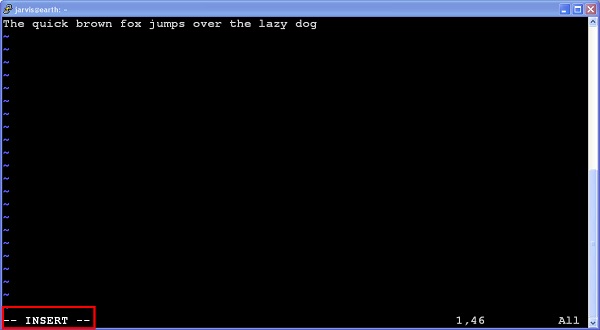
You can use this mode to enter/edit text. To switch from default command to insert mode press i key. It will show current mode in bottom left corner of editor.
We can enter any text once we are in insert mode. Below image shows this :

Use Escape key to switch back to command mode from this mode.
Command Line mode
This mode is also used to enter commands. Commands in this mode starts with colon(:). For instance, in previous section quit command was entered in this mode. We can go to this mode either from command or insert mode.
- To switch from command mode to this mode just type colon
- To switch from insert mode to this mode press Escape and type colon
NOTE − Here onwards, any Vim command starting with colon indicates that we are executing that command in command line mode.
Visual mode
In this mode we can visually select text and run commands on selected sections.
- To switch from command mode to visual mode type v
- To switch from any other mode to visual mode first switch back to command mode by pressing Escape, then type v to switch to visual mode
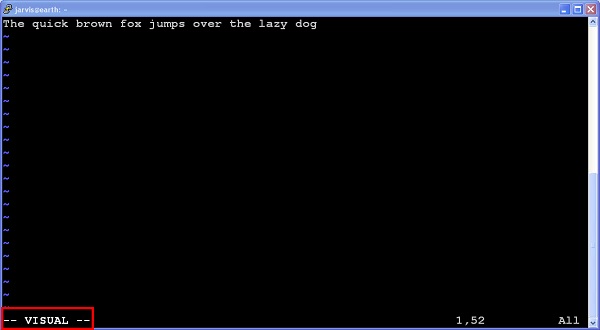
In below image bottom left corner shows visual mode.

Perform below steps to create and save new file:
- Execute
$ vimto open Vim - Type
:edit message.txtin vim - Switch to insert mode with
i - Enter some text
- Switch back to comand mode by pressing Esc
- Type
:wand press enter to write changes to a file - Quit vim by typing
:qand pressing Enter
Perform below steps to edit existing file:
- Type
$ vim message.txtto open file in vim - Switch to insert mode with
i - Enter some text
- Switch back to comand mode by pressing Esc
- Quit vim without saving by typing
:q!and pressing Enter - Or type
:wqand press enter to write changes to a file and than quit